Feel free to download the resources for this lesson. There, you’ll find the tabs for all intervals and some additional tools that you can print out and use in your guitar practice.
Just in case you have missed parts 1 & 2:
Part One is on How to Build a Strong Fretboard Understanding 1/5 – Horizontal Diatonics. There, I show you a great exercise on how you can learn all the notes on the fretboard and simultaneously develop a good technique. Start there if you haven’t already. It’s the most important foundation you need for almost everything.
Part Two covers How to Build a Strong Fretboard Understanding 2/5 – Horizontal Intervals. You need to learn this before you start the exercises here, or at least I highly recommend it. In that part, you learn the intervals in a more tangible and visual way, so check that out as well.
Table of Contents
Welcome to part three of our series on Building a Strong Fretboard Understanding.
So far, we’ve been focusing on the horizontal side of the fretboard, working through note names and intervals on single strings in all keys. But now, it’s time to kick things up a notch.
In this post, we’re shifting our attention to the vertical dimension of the fretboard.
If you’ve been following along, you’re probably starting to feel more comfortable playing horizontally. However, moving vertically adds a new layer of complexity. The intervals and finger movements work differently, and that’s what we’re going to break down today.
I’ll walk you through everything you need to know about vertical intervals, and we’ll get into some hands-on exercises that will deepen your understanding. Plus, I’ll be diving deeper into the music theory behind intervals—but don’t worry, I’ll make it as clear as possible!
By the end of this post, you’ll not only be playing intervals across multiple strings but also have a solid grasp of the theory behind them. Let’s jump in
Interval Lesson: Practical Theory
Understanding Intervals
By now, you should have a solid grasp of how to play the basic intervals we covered in part two. If you’ve been practicing, you may have run into some questions—totally normal! The music theory behind intervals can be tricky, so let’s tackle some of the finer details.
Counting Intervals: A Refresher
In part two, we focused on counting intervals within a specific key. For example, when counting a second, you’d go: 1–2. A third? 1–2–3. And for a fourth, 1–2–3–4—simple, right?
But as soon as you are not limited by the note limitations of a specific key, things start to get complicated. Now, you need to count half steps, and that’s where we need to pay close attention.
The Half-Step Dilemma
Let’s say someone asks you to play a minor third starting from G, and not telling you stay in a specific key like we did in Part 2 of this series.
You know that a minor third is 3 half steps away, so you count: G to G♯ (1), G♯ to A (2), and A to A♯ (3). But hold on—A♯ isn’t a minor third from G.
Why?
It’s because A♯ is still a form of A, and A is always a second in relation to G. Even though you counted 3 half steps, the interval from G to A♯ is actually an augmented second, not a minor third.
To get the true minor third from G, you need to count 1–2–3, so it’s G–A–B. Therefore it must be B. But B is 4 Half-Steps away from G. It’s a Major Third.
So you have to lower the B by a half step, giving you B♭, which is your minor third. The notes A♯ and B♭ sound the same, but they’re named differently depending on the context—this is called enharmonic equivalence.
Major, Minor and Perfect Intervals
There are two main types of intervals:
- Perfect Intervals: These include the unison, fourth, fifth, and octave.
- Major and Minor Intervals: These include the second, third, sixth, and seventh.
You can modify these intervals by raising or lowering the number of half steps:
- Augmented (raised by a half step)
- Diminished (lowered by a half step)
For example, a perfect fourth (C to F) spans 5 half steps. Lower it by a half step, and you get a diminished fourth (C to F♭), which spans 4 half steps. Raise it by a half step, and you get an augmented fourth (C to F♯), which spans 6 half steps.
Why Knowing Intervals Matter
You might be thinking, “Why do I even need to know this? Why not just rely on half steps, like we do with units of measurement, and say this interval is six half steps wide?”
That’s a great question.
The reason intervals are more than just measurements of half steps is because they describe relationships between notes, not just the distances between them. To help clarify this, let’s first take a look at a scale and then dive into triads.
Imagine a scale like C major, with its notes C, D, E, F, G, A, B. Every note in this scale can be related to another note within the scale. For example, if you want to understand the relationship between C and E, you count from C to E: 1, 2, 3. So, the relationship from C to E is called a third, because E is the third note from C.
Similarly, if you look at the relationship between D and A, you would count: 1, 2, 3, 4, 5. This tells us that A is a fifth in relation to D.
But what happens if we change our reference to a different scale, like the C minor scale? The C minor scale has the notes C, D, E♭, F, G, A♭, B♭. While the relationships remain the same, the intervals themselves change slightly.
For instance, in the C minor scale, the third note is now E♭. So, while it’s still a third, it’s no longer a major third; instead, it’s a minor third. Likewise, the fifth note from D in the C minor scale is now A♭. This is still a fifth, but it’s a diminished fifth rather than a perfect one.
Now, let’s explore why these distinctions matter, particularly when we look at triads.
Triads and the Importance of Interval Naming
In general, the basic formula for a triad is 1–3–5, which means you take a root note, add a third above it, and then a fifth. Pretty straightforward, right?
You can build this from any note. For example, you could create a triad starting from A, or from B, or C, or D—you get the idea.
But now that you understand how to make finer distinctions with intervals, you can be much more specific with this formula. Instead of just saying “root, third, and fifth,” you can say root, minor third, and perfect fifth, which opens up the formula to create very specific types of triads.
Let’s use the example of an A minor triad (A, C, E):
- The root is A,
- The minor third is C (3 half steps from A),
- And the perfect fifth is E (7 half steps from A).
So far, this makes sense. But now, let me create a false example to show why it’s so important to name intervals correctly.
Let’s stick with the A minor triad, but this time, we’ll only focus on the number of half steps.
- The root, A, stays the same.
- The minor third, C, is 3 half steps away from A—but here’s the catch: an augmented second is also 3 half steps away.
Likewise, a perfect fifth (A to E) is 7 half steps wide, but so is a diminished sixth.
Now, if you were to replace the minor third with an augmented second (A to B♯) and the perfect fifth with a diminished sixth (A to F♭), the intervals would sound identical to an A minor triad. However, the chord would be unrecognizable—it would no longer function as a minor triad.
This is why naming intervals correctly is crucial. While the half-step distances might be the same, the function of the notes within the chord changes entirely. Using the proper interval names ensures that the chord retains its correct structure and meaning.
This is where the naming system becomes crucial. By sticking to the formula of a minor triad (1–♭3–5), the chord maintains its recognizable structure.
For example:
- If you diminish the perfect fifth (A, C, E♭), you now have a diminished triad.
- Or, if you raise the minor third (A, C♯, E), you get a major triad.
In both cases, the naming conventions—1, 3, and 5—remain valid, and the chord still makes sense functionally. This consistency helps musicians communicate clearly and understand the role each note plays within the chord.
The Tritone
Before we jump into the exercises, there’s one interval that deserves special attention: the tritone.
In the last video, I briefly mentioned the tritone, and you might still be wondering, “What kind of interval is this? It doesn’t seem to have a specific number assigned to it like the others—so what exactly is it?
The tritone is called “TRITONE” because it’s three whole tones (or six half steps) wide. It’s exactly halfway through the octave and can be seen as either an augmented fourth or a diminished fifth.
For example:
- An augmented fourth (C to F-sharp) is 6 half steps wide, and so is a diminished fifth (C to G-flat).
So, if someone tells you to play a tritone, you actually don’t have to worry too much about the naming—an augmented fourth or diminished fifth are both considered a tritone.
Simple Method For Counting Intervals
I know this might seem overwhelming at first, and it’s true that understanding intervals can be tricky. If this is your first time hearing about this, don’t worry—it’s perfectly normal to feel confused. That’s why I want to give you a relatively simple method to find the correct interval every time with just a little bit of counting.
Here’s how it works:
To find the right interval, follow these two steps:
- Do a rough count using the interval numbers to get the correct interval name.
- Double-check by counting the half steps between the notes to ensure accuracy.
For example, if you need to find the major sixth from the note E, start with the rough count:
1–2–3–4–5–6 → E, F, G, A, B, C
Now you know that C is the 6th note from E.
Next, count the half steps to verify:
- E to F (1 half step),
- F to F♯ (2),
- F♯ to G (3),
- G to G♯ (4),
- G♯ to A (5),
- A to A♯ (6),
- A♯ to B (7),
- B to C (8),
- C to C♯ (9).
Since a major sixth is 9 half steps wide, you’ve got the correct interval.
By using this method—first the rough count for naming, then confirming with half steps—you’ll always find the right interval and its proper name
Preparing Vertical Interval Practice
When it comes to playing intervals vertically across the fretboard, it’s helpful to categorize the practice into two main groups. We’ll cover both categories so you can fully grasp how to apply these ideas. I’ll demonstrate briefly on the high E and B strings, and your task will be to apply the same concept across the other strings and in different keys.
The Two Categories of Vertical Intervals
1. Playing Intervals on Adjacent Strings
The first category involves playing intervals on adjacent strings. Practicing this way allows you to work with five different string pairs, which will cover the entire fretboard. These are the pairs you’ll be using:
- High E and B strings
- G and B strings
- D and G strings
- A and D strings
- Low E and A strings
By practicing intervals between each of these pairs, you’ll develop a solid understanding of the fretboard. Remember, as with previous exercises, you’ll want to transpose these into various keys after learning the concept.
Important Note: When you practice on the G and B strings, the finger distances will shift by one fret. This is because the G and B strings are tuned a major third apart, while the other pairs are tuned in perfect fourths. Keep this in mind as you work through the exercises!
2. Skipping One String While Playing Intervals
The second category involves skipping one string while playing the intervals. Instead of playing on adjacent strings, this exercise challenges you to work across a wider range. Here are the four string pairs you’ll be working with, each with one string skipped:
- G and high E strings (skipping the B string)
- D and B strings (skipping the G string)
- G and A strings (skipping the D string)
- Low E and D strings (skipping the A string)
This variation adds a new dimension to your playing and is excellent for developing control and awareness across the fretboard.
Note: You could experiment with skipping two strings, but at this point, it becomes less practical. Focus on these two categories for now to get comfortable with the technique.
Now, let’s begin with the first set of exercises on adjacent strings! By starting simple and progressing gradually, you’ll soon have a complete understanding of how to play intervals vertically across the fretboard.
Practicing Intervals
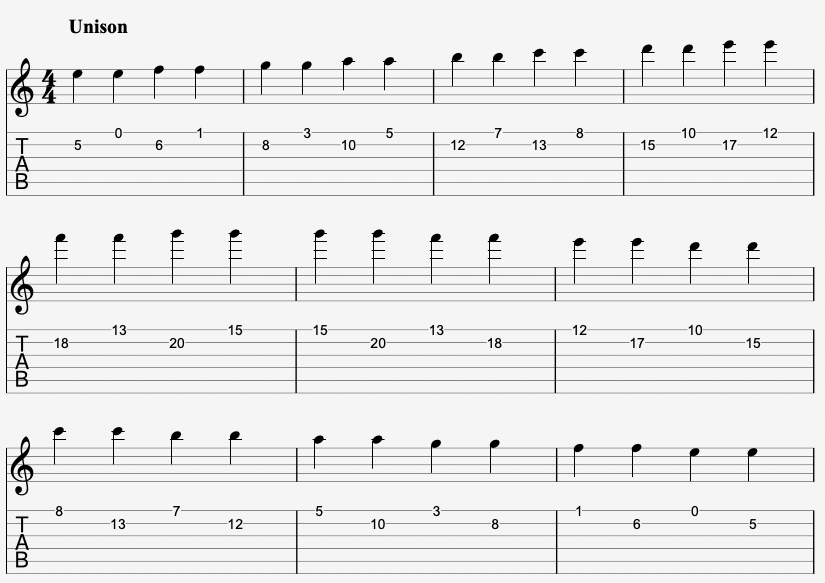
One of the unique things about the guitar is that it’s one of the few instruments where it makes sense to practice the interval of a unison. A unison is the distance between two identical notes, like E to E. On the guitar, this is particularly useful because you can play the same note in two different places on the fretboard, or even play them simultaneously. That’s something most other instruments don’t allow, where a note can typically only be played in one spot.
For this exercise, we’ll start on the B string and play an ascending interval, with the second note played on the high E string. Now, for the unison interval, you’ll essentially just be repeating the same note on two strings. However, for the other intervals, you’ll be moving upwards through the scales.
The Unison Intervals
To start the unison interval, begin on the 5th fret of the B string. This is the lowest position where we can play a unison with the open high E string, since both strings will produce an E note. From there, move to the next note: F, then G, A, and so on. You’ll move horizontally along the fretboard with the natural notes.
The Second Intervals
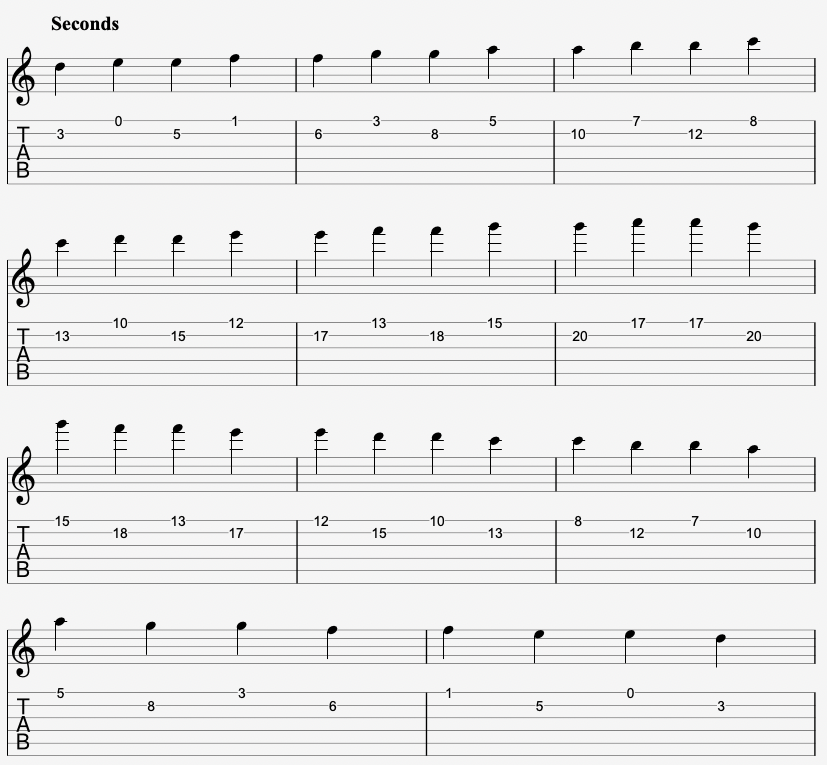
For seconds, we’ll begin on the D note on the B string and play the open high E string as the second. Next, move to E on the 5th fret of the B string, and the second from E is F. From there, move to F on the 6th fret, and the second is G. Follow this same pattern up the fretboard.
The Third Intervals
Next up are thirds. Begin on the C note on the B string, and the open high E string will be the third. Move up to D on the 3rd fret, and the third from D is F. Continue up to E on the 5th fret, and the third will be G. Keep working through this pattern up and down the neck.

The Fourth Intervals
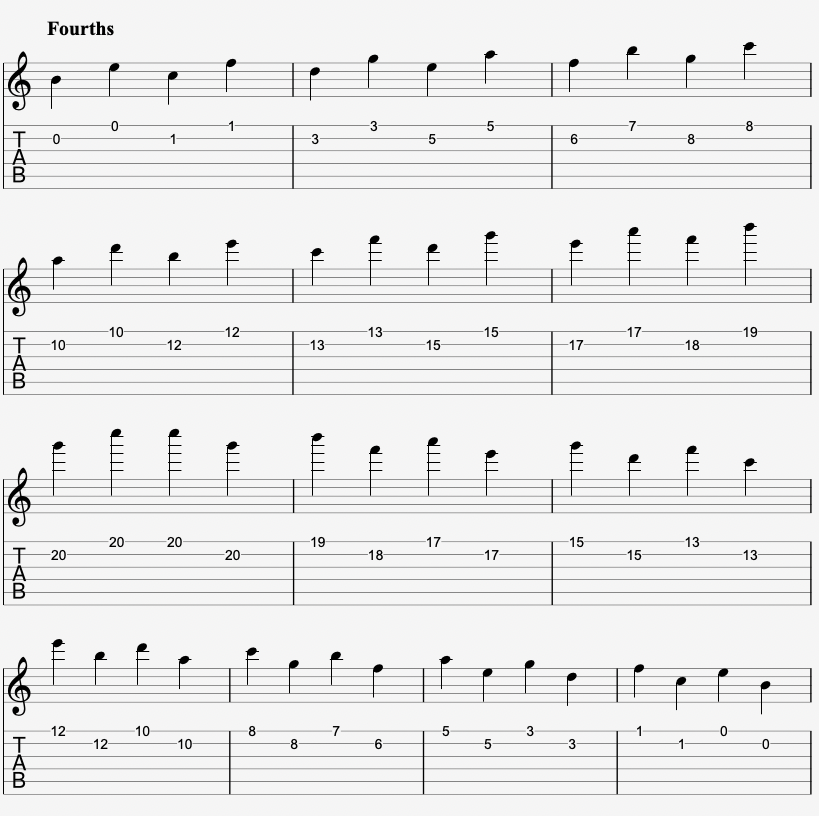
For fourths, we’ll start on the open B string, with the open high E string acting as the fourth. Move up to C, where the fourth from C is F. Continue to D, where the fourth is G, and proceed up the fretboard from there.
The Fifth Intervals
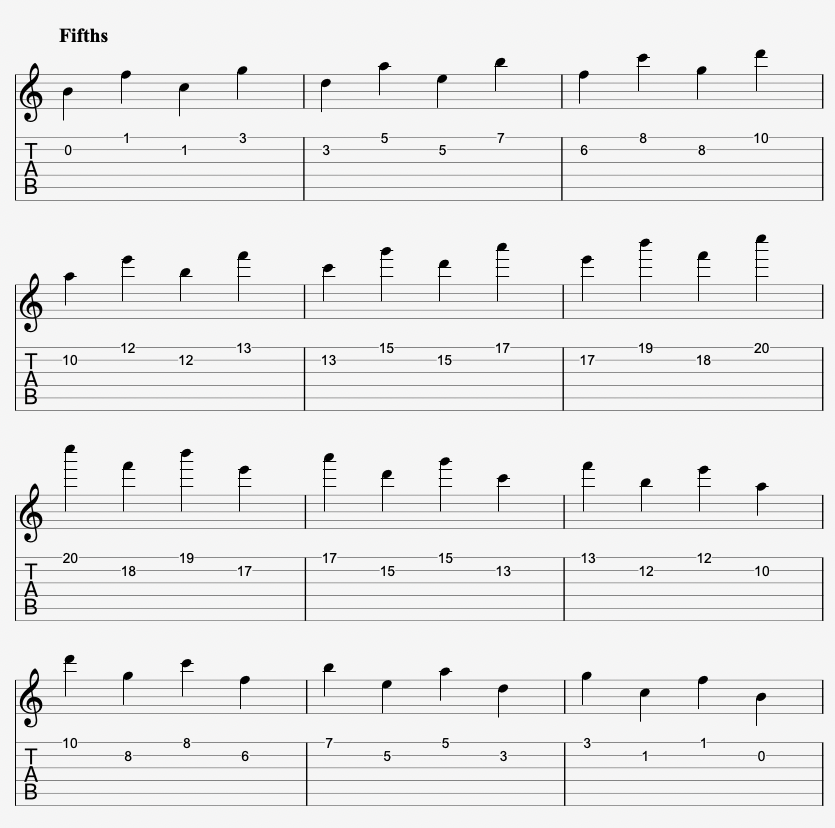
When practicing fifths, begin on the open B string. Here, instead of a perfect fifth, you’ll encounter the tritone (F). Move up to C, and the fifth from C is G. Then, play D, where the fifth is A. Keep moving through the notes.
The Sixth Intervals
For sixths, begin with the open B string and the sixth from B is G. Move up to C, where the sixth is A, and then to D, where the sixth is B. Continue this process up the fretboard.

The Seventh Intervals
Now for sevenths. Start on the open B string, where the seventh from B is A on the high E string. Move to C, where the seventh is B. Continue to D, where the seventh will be C. Work your way up the neck with this interval.
The Octave Intervals
Finally, for octaves, begin on the open B string, where the octave is B on the 7th fret of the high E string. Move up to C, where the octave will be on the 8th fret, and then to D, where the octave is on the 10th fret. Keep ascending through the notes.
Vertical Intervals with String Skipping
Now that we’re skipping a string, things get a bit more interesting. The counterintuitive design of the guitar makes this exercise a bit unusual — you’ll notice that small intervals can involve larger finger and fret distances, while larger intervals might feel more compact. It’s the opposite of what we experienced when playing on adjacent strings.
Let’s dive into each interval and how to play them by skipping the B string.
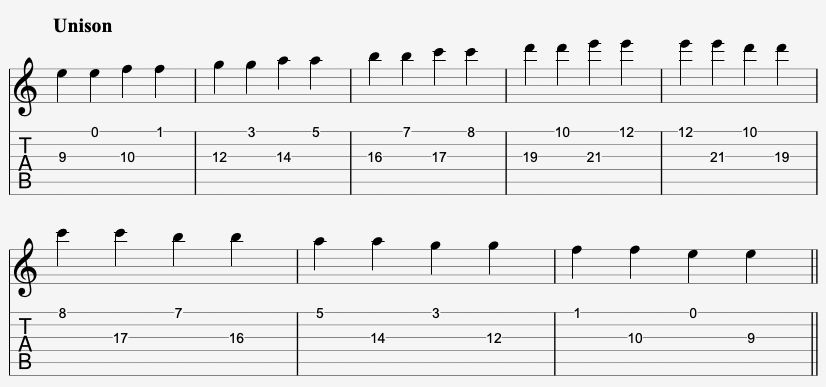
The Unison Intervals
We’ll start with unison intervals. Play E on the 9th fret of the G string, then play the unison E on the open high E string. Move to F on the 10th fret of the G string, with the unison F on the 1st fret of the high E string. Then, play G on the 12th fret of the G string, and its unison on the 3rd fret of the high E string.
Continue this pattern, moving up the fretboard until you reach the end of the fretboard and then descend.
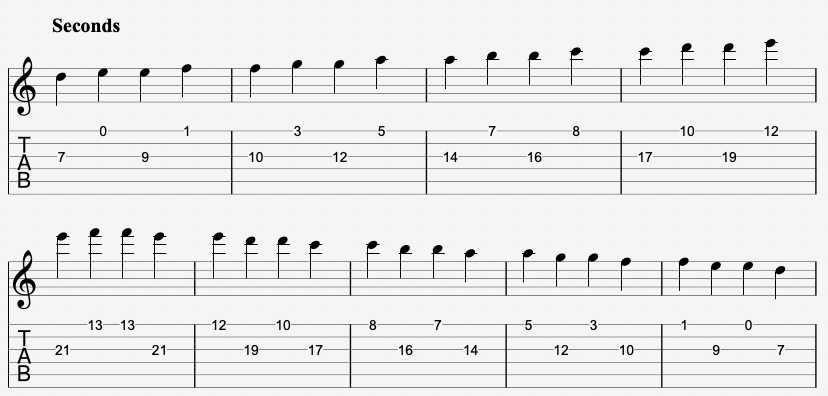
The Second Intervals
Next, let’s play seconds. Start by playing D on the 7th fret of the G string. The second interval from D is E, which you’ll play on the open high E string. Then, play E on the 9th fret of the G string, followed by F on the 1st fret of the high E string. Continue to F on the 10th fret of the G string, playing G on the 3rd fret of the high E string.
Just keep working your way up and down the fretboard in this pattern.
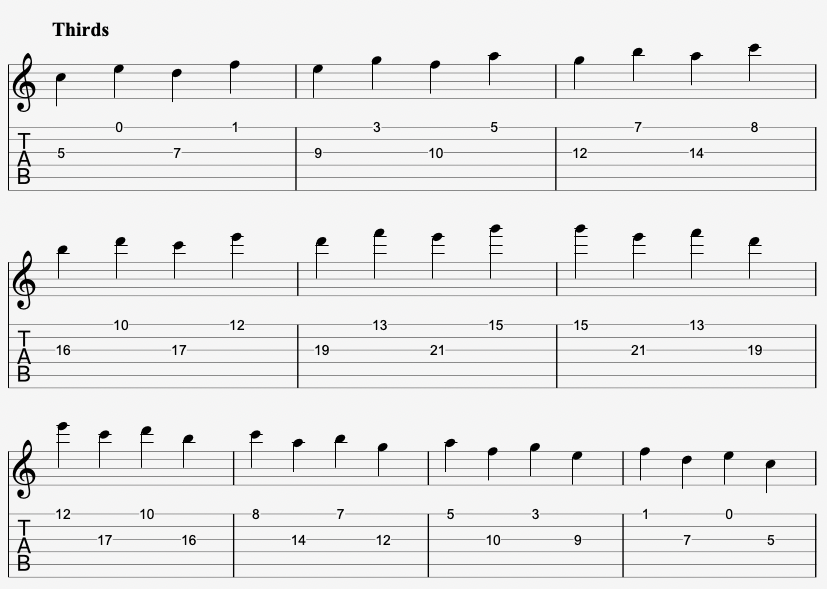
The Third Intervals
For thirds, start by playing C on the 5th fret of the G string. The third from C is E, which you’ll play on the open high E string. Then, play D on the 7th fret of the G string, followed by F on the 1st fret of the high E string. Move to E on the 9th fret of the G string, with the third being G on the 3rd fret of the high E string.
Work your way up and down the fretboard in the same manner.
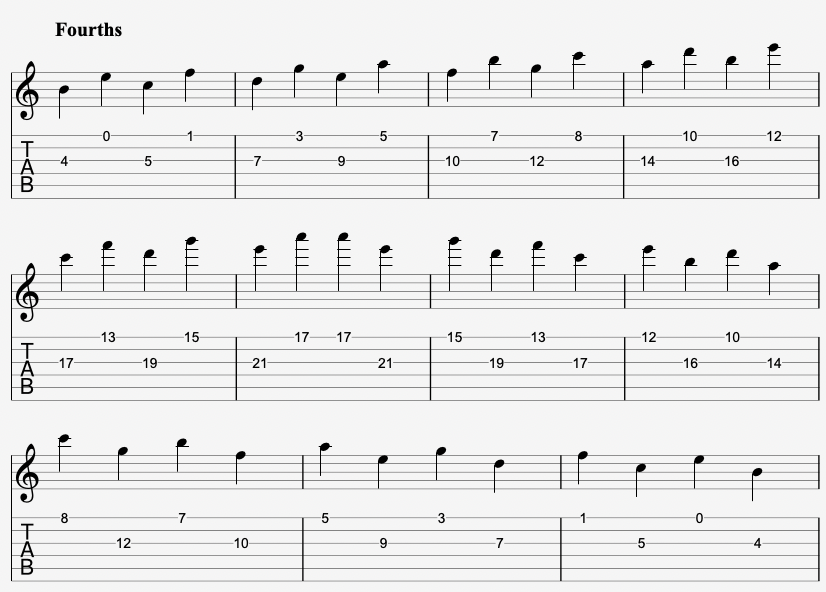
The Fourth Intervals
Moving to fourths, start by playing B on the 4th fret of the G string. The fourth from B is E, which you’ll play on the open high E string. Move to C on the 5th fret of the G string and play F on the 1st fret of the high E string. Then, play D on the 7th fret of the G string, and G on the 3rd fret of the high E string.
Keep moving up the neck following this pattern.
The Fifth Intervals
Let’s move to fifths. Begin on the 2nd fret of the G string, where A is located. The perfect fifth from A is E on the open high E string. Next, play B on the 4th fret of the G string and the fifth from B, which is F (the tritone) on the 1st fret of the high E string. Then, play C on the 5th fret of the G string, followed by G on the 3rd fret of the high E string.
Continue this pattern up the fretboard.

The Sixth Intervals
For sixths, begin by playing the open G string. The sixth from G is E, which you’ll play on the open high E string. Then, play A on the 2nd fret of the G string, with the sixth from A being F on the 1st fret of the high E string. Move to B on the 4th fret of the G string, and play G on the 3rd fret of the high E string.
Continue this exercise up the fretboard.

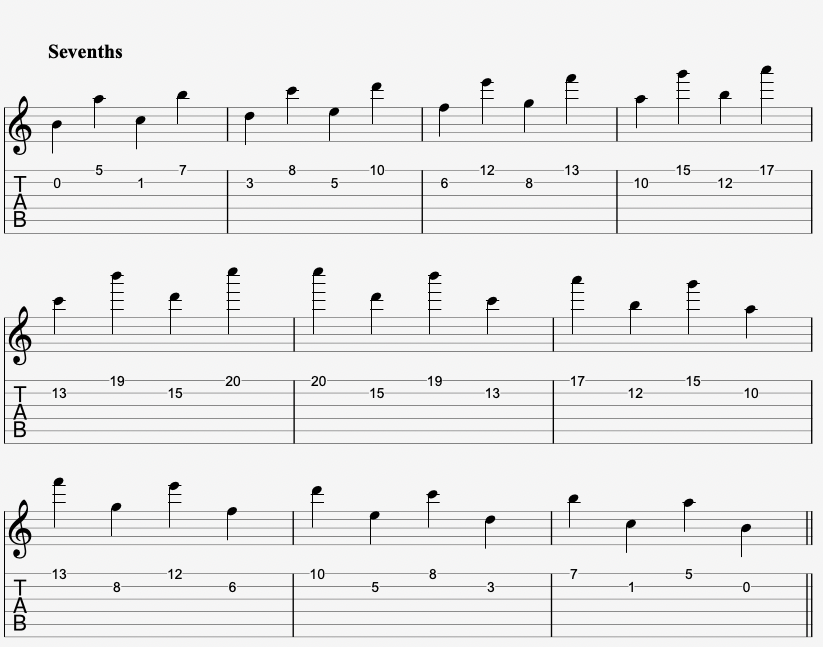
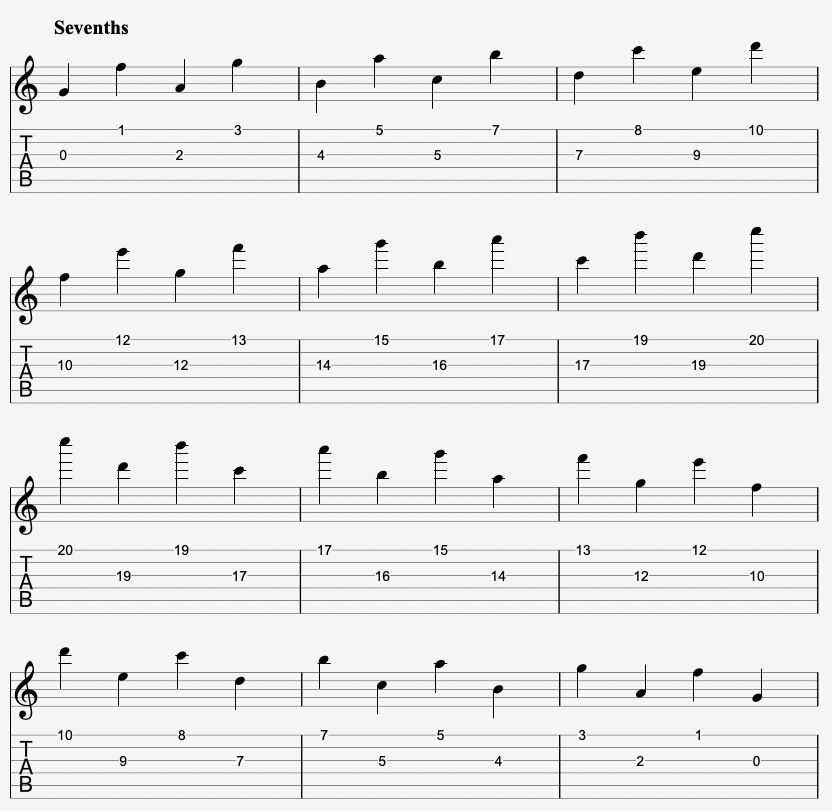
The Seventh Intervals
Now let’s tackle sevenths. Start with the open G string. The seventh from G is F on the 2nd fret of the high E string. Then, play A on the 2nd fret of the G string, with the seventh from A being G on the 3rd fret of the high E string. Move to B on the 4th fret of the G string, and the seventh from B is A on the 5th fret of the high E string.
Keep going up the neck with this exercise.
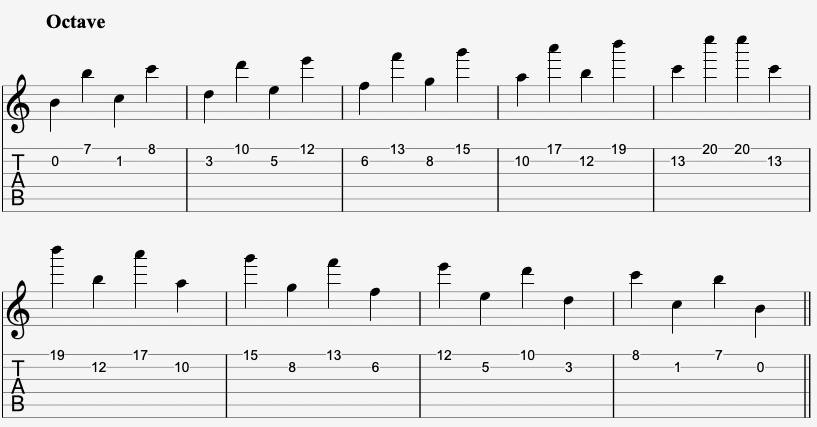
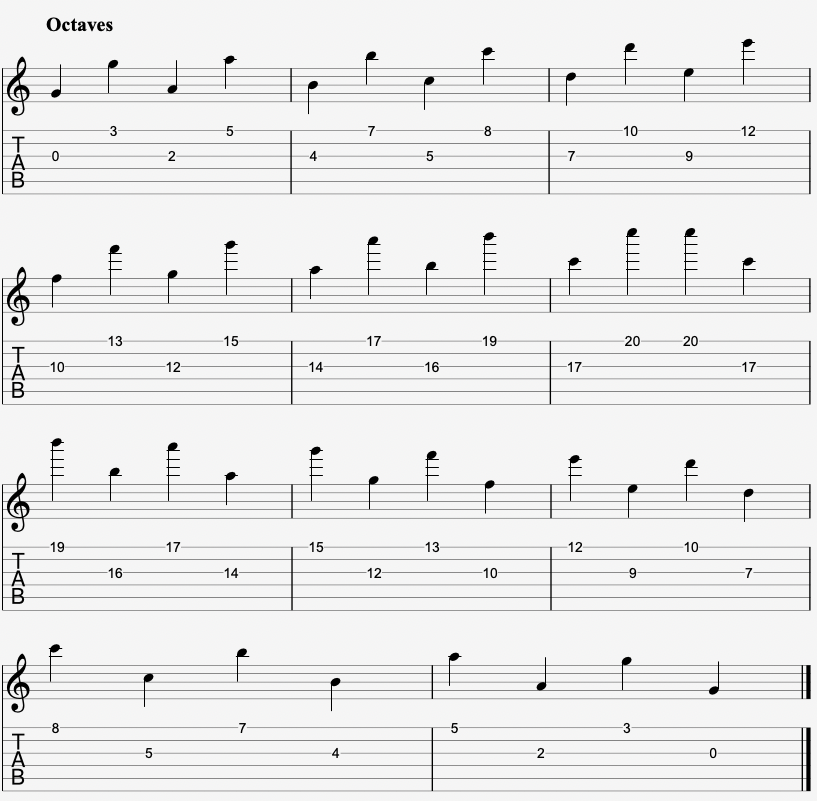
The Octave Intervals
Finally, for octaves, start with the open G string. The octave from G is G on the 3rd fret of the high E string. Next, play A on the 2nd fret of the G string, and the octave from A is A on the 5th fret of the high E string. Move to B on the 4th fret of the G string, and the octave from B is B on the 7th fret of the high E string.
And that concludes the final exercise.
How To Practice
Just like the previous exercises, this one is both extensive and comprehensive. However, the modularity of the exercise works to your advantage. Let me quickly explain the possibilities, so you can structure your practice sessions effectively.
You have several factors that you can combine in various ways:
Two categories of vertical intervals: adjacent strings and string-skipping.
String pairs: five pairs in the adjacent string category and four pairs in the string-skipping category.
Intervals: eight intervals to practice, from unison to octave.
Keys: twelve different keys to work through.
You can choose to focus on one string pair, interval, and key during a single practice session, which is great if you’re short on time or want to deep-dive into one aspect. Alternatively, you can opt for a more extensive session where you cover multiple string pairs, intervals, or keys. There’s plenty of room to adjust based on your schedule and goals.
Creating a practice plan is a great way to ensure you’re covering all the necessary areas in a systematic and progressive way. By planning ahead, you’ll be able to track your progress while avoiding feeling overwhelmed by the sheer number of combinations available.
To help you with this, I’ve created a worksheet that you can download. It’s designed to help you organize and track your practice sessions by letting you mark off each session as you complete it. Feel free to download and use it or create your own version that suits your personal goals. (The download is at the top of this post, in case you haven’t noticed…)
What's Next?
Now that you’ve got a solid grasp on vertical intervals, you’re really starting to understand the fretboard at a deeper level. In the next video, we’ll dive into scale chunks, which will completely change how you approach scales. I’m really excited to show you how this works, and I think you’ll find it makes scales much easier to understand.
If you have any questions or thoughts about this series so far, feel free to leave them in the comments—I’d love to hear from you!

