
Hey friend, I think it’s important to spend some time composing and thinking thoroughly about how to write a guitar solo, and not falling for the illusion that most great solos were “just improvised on the spot.” Most of them weren’t.
Let me take some pressure off right away: you don’t have to improvise a perfect guitar solo in a few takes. That’s hard even for pros. Many great solos are actually “composed”, refined, and shaped before they ever reach your ears. There’s usually a workflow behind good solos. And once you adopt a solid workflow, you’re far more likely to create a solo you actually like and can be proud of than if you just improvise and hope for the best.
Table of Contents
SUMMARY
How to write a guitar solo?
To write a guitar solo, start by outlining the chord tones of the progression. Then create a simple arc to get the big picture, develop short motifs, turn them into phrases, create a first draft, and finally edit the solo until only the best ideas remain.
The workflow in short:
- Step 1: Outline the chord tones
- Step 2: Create a simple arc
- Step 3: Develop short motifs
- Step 4: Turn motifs into phrases
- Step 5: Create a first draft & edit the solo
If I had to be brief: “The goal is not to think theory like scales, triads etc. The goal is to create musical ideas like motifs and phrases. Some of those ideas may or may not appear as scales or triads as a result.”
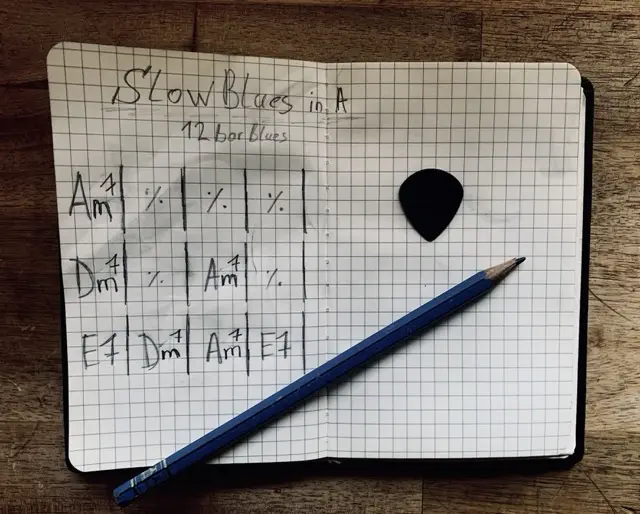
For this lesson, I’m using a slow blues solo I wrote over a 12-bar blues in A minor. So instead of only talking about theory, I’ll show you how each step appears in a real solo.
You can watch the video of me playing it, listen to the recording, and study the free tabs that show the ideas on “paper.”
Listen to the Guitar Solo
Watch me playing
Usually, players hit the same wall: they know a couple of scale shapes and have learned some cool licks… but when it’s time to solo, everything turns into “noodling.” The notes might not be completely wrong, but the solo doesn’t really say anything. There isn’t much musicality in there. This guide will help you fix that.
But this isn’t only a practical framework for writing a guitar solo. The same process will also improve your improvisation skills, because before you can improvise good solos on the fly, you first need to understand why good solos sound musical.
This is an in-depth article, so I suggest you first read through it, listen to the examples, and try to understand the concepts I explain here. Then, as a second step, you can get practical and apply the process to your own music. Choose any backing track or chord progression you like and write a guitar solo over it. You’ll work in five steps, so you never have to solve every problem at once. If you work through the process thoroughly, you’ll likely end up with a finished solo.
The Real Goal: Serve the song
A guitar solo doesn’t exist in isolation. It’s usually part of a song, so it needs to fit and serve that song. When you learn the craft of writing music, you need to pay attention to two things:
- the big picture
- the little details
If you take care of these two things, you’ll do a much better job of serving the song.
The big picture
The big picture means your solo needs to make sense in the musical context around it. So before you even think about scales, licks, or motifs, ask yourself a few simple questions:
- What kind of song is this? A blues? A pop song? A love ballad? Prog rock? A jazz standard? Every style has certain musical conventions. Be aware of them and work with them!
- Where does the solo appear? Is it an intro solo? A middle section after the second chorus? An outro solo?
- What happens before and after the solo? Does the song suddenly lead into an intense chorus afterward? Or does it calm down?
All of these things matter because they already dictate important requirements for your solo—and that’s actually a good thing. It means you have fewer decisions to make.
The point is: your solo is just one part of a bigger song. Your job is to support and serve that song with your solo. How you do that is part of your artistic freedom—and part of the challenge.
The little details
On the level of the little details, you translate the “big picture” into actual musical decisions.
The little details are things like:
- Which melodic ideas do I use? Can I reuse fragments of the vocal melody?
- How can I create intensity?
- Which rhythm, articulation, or techniques fit the emotional context of the song?
For example:
- If it’s a pop song or a love ballad, maybe you reuse a tiny fragment of the vocal melody from the chorus.
- If it’s an epic metal solo section, maybe you create intensity through aggressive vibrato, fast alternate picking, or a harmonic minor scale.
- If you need strong contrast before a simple bridge, maybe you suddenly increase rhythmic or harmonic complexity.
- This is where motifs, phrasing, note choice, rhythm, articulation, dynamics, vibrato, bends, and technique all come together.
The important thing is this: Be intentional with most of your choices!
Be intentional with your choices of notes, rhythm, articulation, dynamics, phrasing, and technique. Those decisions are usually far more important than obsessing over “which scale fits over which chord.”
Don’t do this
By now, it should also be clear what this doesn’t mean:
- Don’t run scale patterns up and down.
- Don’t use technique just for the sake of technique.
- Don’t stitch together random favorite licks.
If you don’t neglect the big picture and focus on serving the song, the little details tend to take care of themselves. You stop thinking in terms of scale patterns, flashy techniques, and random licks, and start thinking in terms of musical ideas. But we’ll get very specific about that in a minute.

The 5-Step Framework for Writing Better Guitar Solos
When guitarists struggle with writing a guitar solo, it’s often because they’re trying to do everything at the same time. But composing a guitar solo is less of a single action and more of a multi-step process. The easiest way to approach it is to focus on one specific task at a time and gradually build the solo piece by piece.
That’s why this method uses five steps. Each step focuses on just one job, so you don’t have to solve the whole solo at once. Work through all five steps and you’ll likely learn how to construct a guitar solo much more easily.
The 5 steps
- Chord notes — aim for chord notes so it fits the progression
- Arc — develop the big picture
- Motif — find short ideas worth repeating
- Phrasing — turn your motif into clear and longer “sentences”
- Finalize — edit, simplify, and polish it into a performance-ready guitar solo
How to capture and record your guitar solo ideas
For the technical side, use whatever medium helps you: tabs, software like Guitar Pro, a simple phone recording, or tracking yourself on your computer using a DAW.
I do both: I record in my DAW and write everything down in Guitar Pro. First, I lay out the entire structure of my solo in my DAW (using the Arrangement and Chord tools, but simple markers work too). That way I can see the space for the whole solo on the screen. When I’m finished with the process, I write it down in Guitar Pro.
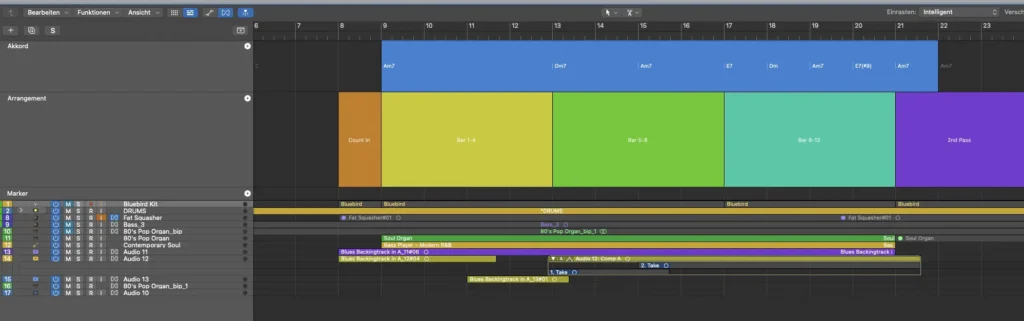
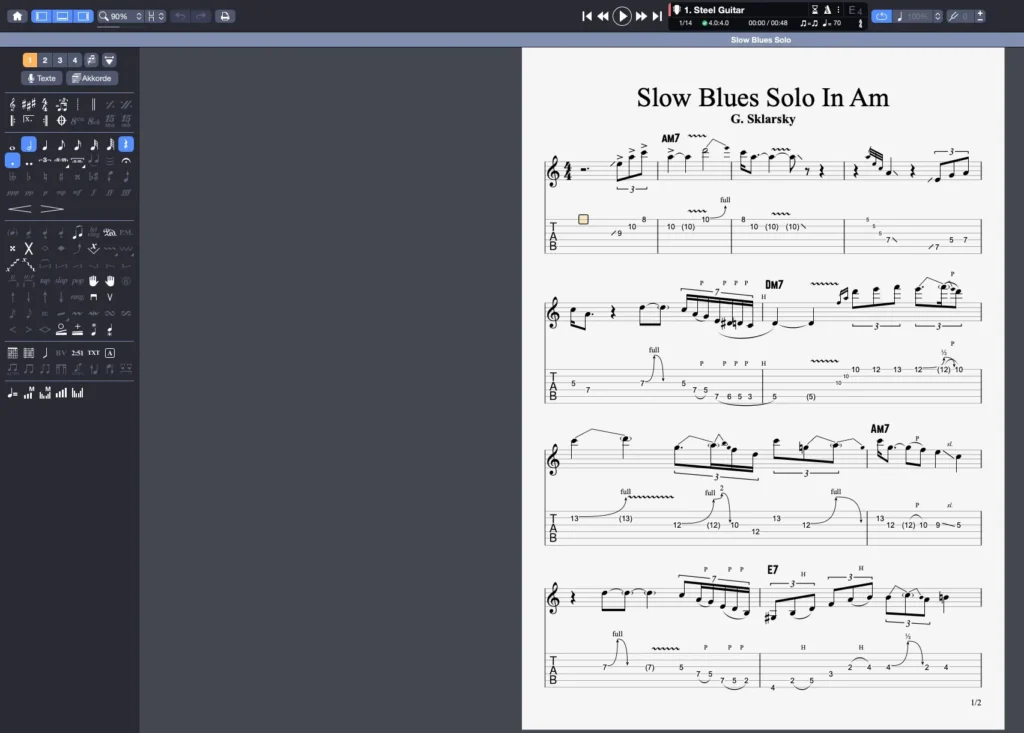
The tool isn’t the point. You have to find a workflow that works for you—there’s no single “right” or “wrong” way to do it. Many players won’t write everything down. That’s fine.
Step 1 — Outline the Chord Tones
A good first step is to build a foundation for strong note choices that helps you find and develop motifs and phrases more easily (I’ll explain what motifs and phrases are in a minute).
That foundation is outlining the chords.
But if you’re already an experienced guitar player and know the notes of the underlying chords by heart, you can skip this first step.
Instead of trying to invent a motif from “any of the 12 notes,” you focus on a small set of related notes: the chord tones and a few nearby notes you use to create tension and resolution.
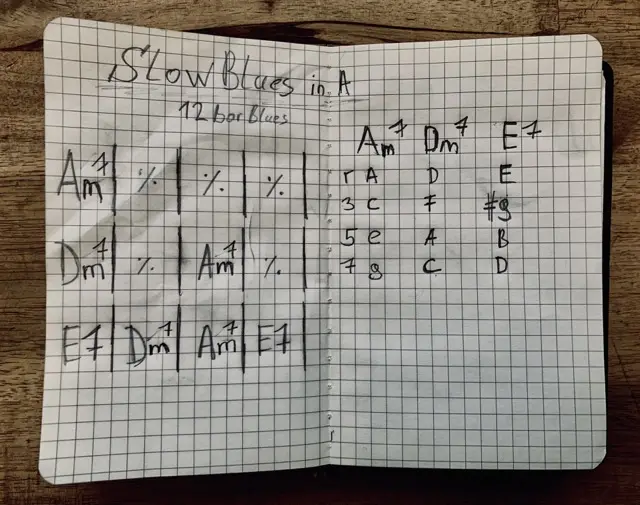
To do this, you outline the essential chord tones for the chord progression you’re soloing over. In a blues context it’s often quite simple, because you’re usually dealing with three main chords (I7, IV7, V7).
The minimum chord-tone approach (no theory overload)
Here’s the minimum you need to be aware of:
Chord tones: 1–3–5 (and often 7) If you land on one of these on a strong beat, especially at the end of a phrase, it usually sounds ok.
Tension notes: passing or neighbor tones that lead into chord tones These are often a note above or below a chord tone (1 or 2 frets). Their job is to create a little pull and then resolve into the chord tone.
If you keep that in mind, you’ll start coming up with ideas that sound more intentional.
Create a little tension → then resolve it into a stable chord tone.
Do this next
Your task is simply to outline the chord progression you’re improvising over and stay aware of the chord tones as well as their neighboring tones. With that foundation in place, it will be easier to find small ideas (motifs) in Step 3. But before that, we need to get a rough sense of the big picture in order to prepare for Steps 3 and 4.
Step 2 — Create a Musical Arc
Before you start jamming and searching for motifs in Step 3 and phrases in Step 4, there’s one idea I want you to keep in mind.
It’s important because it helps you get the big picture right and ultimately write a solo that does a better job of serving the song.
So what is that idea?
It’s the thing that makes your guitar solo feel like it’s going somewhere—maybe even telling a story:
An arc.
You already know that your guitar solo should serve the song and that it’s usually just one part of it. But your solo still has its own space and development. In a way, it can be viewed as a composition inside a composition.
To write guitar solos that are worth to remember, your solo needs to create the impression that it’s going somewhere. That simply means it needs to develop over time. And the easiest way to create that development is to structure your solo with contrasting parts.
A very simple way to think about this is a three-part shape:
- a beginning
- a middle
- an ending

To create an arc, you can gradually increase the intensity of your solo. The beginning is low intensity, the middle builds tension, and the ending reaches the highest level of intensity. That’s just one simple type of arc (there are many variations), but it’s enough to give your guitar solo a clear structure that you can work with.
The Arc Behind My Blues Solo
The simple idea behind the arc of my solo was this: I start strong and end strong, using the same motif at the beginning and the end, with a more laid-back section in the middle.
This idea came naturally once I found the first triplet motif, which I’ll show you in step 3. It works beautifully as a classic blues intro and outro.
So, in a very simplified form, the arc of my blues solo looks like this.

So how do you create an arc in your playing? It all comes down to intensity. Different levels of intensity create the contrast that allows the listener to hear a beginning, a middle, and an end. In other words, if you want your solo to feel like it’s developing, you need to know how to gradually increase (or decrease) intensity throughout the solo. Let’s look at a few practical ways to create intensity on the guitar so you can build an arc on purpose.
5 ways to create intensity
You can create an arc by combining these five musical elements:
- Register: Where you play on the fretboard matters. Lower notes tend to feel lower in intensity; higher notes tend to feel more intense. For a simple arc: start low, move into the middle register, and save the higher register for the finale, so the solo can “scream” when it needs to.
- Note density: At the beginning, use more space and longer notes. As intensity increases, you typically play more notes with less time between them. Let the solo breathe early, then increase the note density toward the end.
- Tension and release: Most progressions already contain an arc of tension and resolution. Your job is to highlight it. In a blues example, you can hear this clearly: the V chord creates tension that resolves back to the I chord. If you emphasize that moment, simply by clearly outlining the V chord tones, you highlight this tension and release. You can also create additional tension-and-release moments that are not written directly into the chord progression. Identify the tension-and-release points in your progression, or create them if necessary, and place them thoughtfully to support your arc.
- Vibrato intensity: Start with little or no vibrato. Then gradually increase vibrato intensity toward the end. It’s subtle but incredibly powerful. Especially when your final notes have confident, expressive vibrato.
- Complexity: As intensity rises, complexity can rise too. That can mean technical complexity (legato, bends, faster runs, maybe tapping, if that’s your style…). It can also mean musical complexity: more surprising rhythms, more adventurous note choices, or stronger tension before resolution. Just make sure complexity serves the arc.
Please keep this in mind as you work on finding motifs and phrases in the next two steps. Don’t neglect the arc—tell a story.
Step 3 — Create a Motif
This step is really the most important one. It’s where we start making real music. It’s a fantastic first step in composition and one of the most effective ways to compose guitar solo ideas that don’t sound random.
The concept is incredibly simple:
Choose one small idea and reuse it.
That small idea is called a motif.
A motif is a classic composing technique used across basically all genres. It’s a short fragment whose whole purpose is to be reused, tweaked, and recognized throughout a piece of music.
When you reuse that idea (and reshape it slightly), your guitar solo suddenly has cohesion. The listener gets the sense, “Ah—this belongs together.
What a motif is (and why it works)
A motif is a short musical statement. It can be as short as two notes, and it’s usually not more than 4–6 notes. It’s not a full melody, it’s much smaller than that.
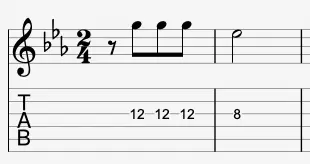
Probably the most famous motif in music history is the opening of Beethoven’s 5th Symphony: the famous four notes (“da-da-da-daa”). In a second, I’ll show you the motifs I used in my slow blues solo so you can see what counts as a motif in a real guitar solo.
A motif can be ridiculously small:
- 2–4 notes
- one simple, distinct rhythm
The motifs I used in the slow blues solo
In my solo, I used only three motifs for the entire guitar solo. For clarity, I’ll name them here:
- the “triplet motif”
- the “descending third motif”
- the “transition motif”
Each motif appears multiple times across the solo, and in a few spots I use slight variations (different register, different ending, altered note choice, same rhythmic identity, etc.).
Let’s first take a look at the “triplet motif”.
First appearance of the triplet motif (prelude to bar 1)
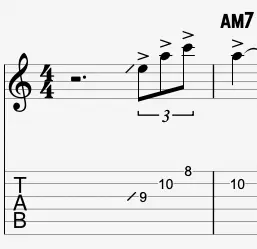
This motif is built from a triplet rhythm and a triad-based note choice. In my example it’s a simple A minor triad (2nd inversion) that resolves to the root note A.
This triplet motif appears five times throughout the solo. It’s the most important motif here because it opens the solo and it returns again at the end, which creates a strong sense of “full circle.”
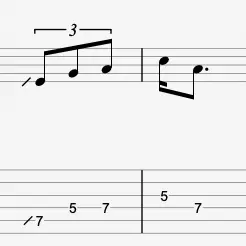
Variation 1 of the triplet motif in bar 3-4
Variation 2 of the triplet motif in bar 9
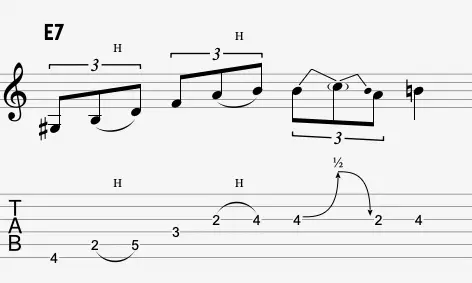
Variation 3 of the triplet motif in bar 10
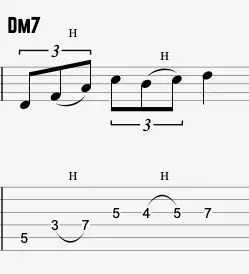
Reusing the first triplet motif in bar 11
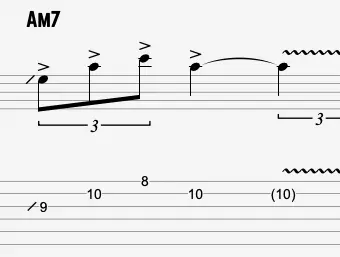
Notice how many things you can change while still keeping the motif recognizable: you can extend it, shorten it, alter the ending, or even deviate from the triad—yet the triplet rhythm still makes it feel like the same idea.
Listen to all five triplet motif occurrences back-to-back so can really hear the essence of the triplet motif.
Great! Let’s move on and take a look at the “descending third motif”.
First appearance of the descending third motif (bar 2)
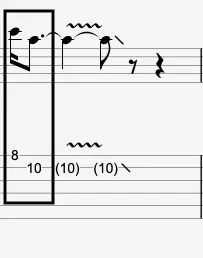
This motif is built around a descending minor third interval plus a distinctive rhythm (in my example: a 16th note into a dotted 8th). Even though it’s very short, it’s extremely characteristic in blues phrasing.
2nd appearance of the descending third motif (bar 4)
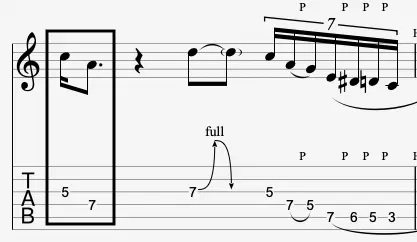
3rd appearance of the descending third motif (bar 7)
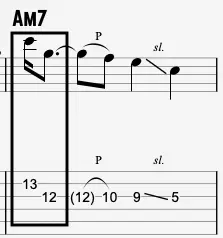
4th appearance (reusing) of the descending third motif (bar 13)
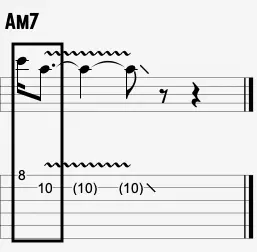
This motif appears four times across the solo. Two of the appearances are identical (early and late in the solo). One variation places the same idea an octave lower, and another keeps the rhythm but changes the interval (a perfect 4th instead of a minor 3rd).
Listen to all four descending third motif occurrences back-to-back so you can really hear the essence of this motif.
Okay! Let’s move on and take a look at the “transition motif”.
The transition motif (bar 4)
This motif appears only twice and functions as “connective tissue” between chords—so I call it a transition motif. It starts with a longer note and then moves into a more fluent scale run.
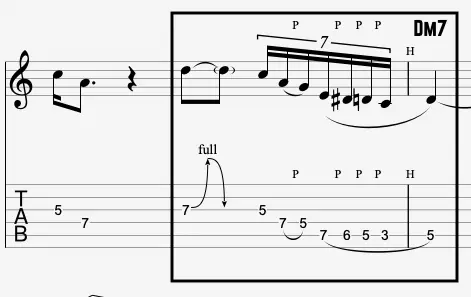
On the first appearance in bar 4, the run includes a chromatic twist (A string, frets 7 6 5) to land on the IV chord (D note as the target).
The 2nd appearance of the transition motif (bar 8)
On the second appearance in bar 8, the final three notes outline E7 (E–D–B) to set up the V chord.
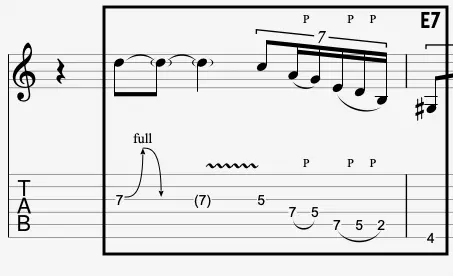
Listen to both transition motifs occurrences back-to-back so you can really hear the essence of this motif.
5 ways to find a motif
Your task is now to find a few motifs for your own solo. Here are five reliable ways to come up with a motif. All you need are a few good ideas that are short and concise. You don’t need anything final or polished at this stage.
- From singing (even if it’s just in your head)
Hum a tiny phrase and copy it on the guitar. This is one of the most practical ways to make a guitar solo sound melodic. - From chord tones
Pick just one strong note that belongs to the chord underneath, then “decorate” it with nearby notes. - From a rhythm
Sometimes the first “idea” that comes up is more rhythm than pitch. Focus on the rhythm and find a few good notes that fit the rhythm. - From something familiar
Borrow a tiny fragment from something you already know—like a melody, a jingle and make it fit your track. For example, imagine the rhythm of something familiar and play it over your progression using your own notes. This way you don’t have to “invent” a rhythm from scratch. It’s a great way to jumpstart the process when you’re in a rut. During the process of adapting it, it stops being a “copy” and becomes more likely your idea. - Think in intervals
Choose one interval that sounds right (like a 3rd or 6th) and just pair it with a specific rhythm. A motif is often nothing more than this: interval + rhythm. Later you develop it by changing one detail—same interval with a different rhythm, or the same rhythm with a different interval.
Step 4 — Turn Motifs Into Phrases
Once you have a motif, you only have a tiny idea. So naturally the question arises. What should you do next? How do you move on from here once the motifs are clear?
The answer is phrasing.
So let’s first get an idea of what phrasing really is because there is a lot of confusion with this term and it often is used for describing the wrong ideas.
What is phrasing?
In music, we usually think about phrasing in two different situations:
- Phrasing when playing music that is already written
- Phrasing when writing music
When a piece of music is already written, musicians still work on their phrasing to shape and refine their own interpretation. The notes are already there, so the work is mainly about how to play the notes—not about deciding which notes to play.
But we’re mainly interested in the second case, because we’re composing. We’re creating our own music, which means we have to think about phrasing on a deeper level. Now we’re deciding both which notes to play and how to play them. The good news is that the core idea behind phrasing is the same in both situations.
So what is phrasing?
Phrasing is the art of grouping notes together so they feel like they belong together.
In phrasing while playing written music (#1), you create those connections through the way you play the notes. This is called articulation. There are many ways to articulate notes, for example:
- Staccato (short and choppy) helps separate ideas.
- Legato (smooth and connected) helps tie notes together.
- Dynamics can emphasize certain notes and shape the phrase.
- Bending and vibrato can add expression and direction.
- Combinations of multiple articulation techniques can further strengthen the musical statement.
In phrasing while writing music (#2), you can of course think about articulation as well. But there is one major difference:
When you write your own music, you can decide how close notes are to each other and when to stop playing.
You’ve probably heard the advice that you shouldn’t play all the time if you want to improvise a good solo. This is one of the reasons why. A phrase becomes much easier to recognize when it is separated from the next phrase by a short pause.
This is actually a deep topic that deserves far more attention than we can give it here. But for our purposes, we don’t need to go that deep.
If phrasing still feels a little abstract, that’s okay. Just remember this:
Phrasing = grouping notes
It’ll become much clearer in the next section when we start applying it in practice.
How to Write Phrases: Contrasting vs. Non-Contrasting Phrases
Let’s get practical and turn our motifs into actual phrases. For this, it’s useful to think in terms of language.
If you treat your solo like a conversation, a motif is not a complete statement. It’s more like a single word or a very short idea. The next step is to develop that idea into something longer: a phrase.
We can do this by simply repeating and varying the motifs we’ve already created.
Generally speaking, there are two ways to continue a motif:
- Non-contrasting phrases
- Contrasting phrases
How to turn a motif into a contrasting phrase
To create a contrasting phrase around your motif it is useful to think in contrasting pairs like:
- question → answer
- call → response
- open → closed
- agreement → disagreement
Listen to your motif in the context of the track. Does it feel like a question or a statement? Does it feel open (unfinished) or closed (resolved)? Then “complete” it with something different.
Let me state the obvious here: this is completely subjective. None of this can be described objectively. There is no such thing as a question and answer in music, or an agreement and a disagreement. I’m just using these words and metaphors in an attempt to describe subjective musical impressions. What I would describe as a question and answer, you may feel differently about, and that’s totally fine. The important thing is that you find a way to create variations of a motif that contain some kind of contrast and feel different from one another. That is the important part.
So how can you do that? You need to find a variation of your motif. The simplest way is to repeat it and change the last note. Or you can keep the rhythm and play different notes, keep the notes and play a different rhythm, or vary both.
Here are two examples to show you what I mean.
Contrasting phrase example Open → closed
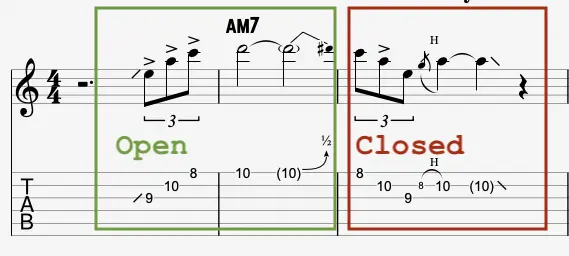
In this example, I took our triplet motif and played it slightly differently to make it sound open. I want you to notice three things.
- First, the “closed” part is very similar to the “open” part.
- Second, the notes that create the contrast are the ending notes. In the “open” part, I end the motif on the note D (10th fret on the e string), which makes it sound open because it is not a chord tone. That creates tension and gives it a sense of openness. In the “closed” part, I land on the root note A (10th fret on the B string), which is a chord tone, so it sounds closed.
- Third, there is a lot of space in between. I’m not playing too much.
Contrasting phrase example: agreement → disagreement
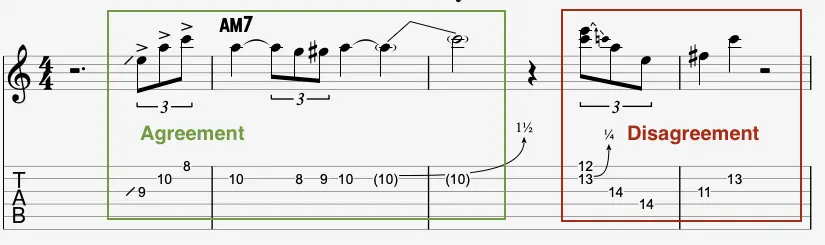
Again, here’s our triplet motif in a different variation. Because this contrasting phrase consists of an “agreement” and a “disagreement”, we can be bolder with our note choices.
Notice that in the disagreement section of this phrase, the note F-sharp (11th fret on the G string) creates a heavy dissonance, which is amplified even more by ending on the note C (13th fret on the B string). The interval between F-sharp and C is a tritone, so it is hard to imagine a stronger disagreement than that.
But don’t overdo this. This is just an extreme example to illustrate how far you can push it. And of course, it is possible to create a lighter disagreement instead of a heavy one.
How to turn a motif into a non-contrasting phrase
A different way is to simply extend one motif into a phrase. If your motif sounds like a question, just play another question to extend it into a phrase. Or if your motif sounds like an agreeable statement, just play another agreeable statement directly after it, so that the phrase does not really contrast at all. You can introduce contrast later in a different phrase.
Non-Contrasting phrase example: closed → closed
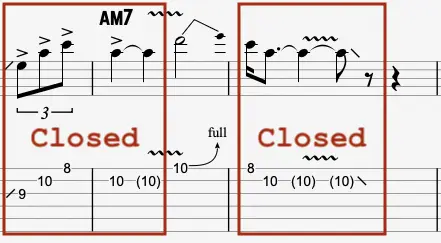
This non-contrasting phrase appears note for note in my slow blues solo. You can hear both the triplet motif and the descending third motif. The two motifs are “glued together” by the full-step bend from D to E on the 10th fret of the high E string. To my ears, both motifs sound closed because they both end on the root note A (10th fret on the B string).
Phrasing checklist (use this on your next guitar solo)
Here are some tips you can apply right away when you’re figuring out how to construct a guitar solo and turn your motif into a musical phrase:
- Start with one motif, then turn it into a short “sentence” by extending (variating) it into a non-contrasting or contrasting phrase. Your goal is to make the listener feel, “That was one complete thought.”
- The easiest variation: change the last note. Pick a clear “landing note” and aim for it at the end of the phrase so it sounds finished and intentional.
- Variation option #2: keep the rhythm, change the notes. If the rhythm stays recognizable, it’s possible that the listener will still hear it as the same idea.
- Variation option #3: reverse the note order while keeping everything else the same. For example, if your motif is a descending triad, try the same triad ascending.
- Intentional silence. After every short phrase, leave a gap to build tension. Be bold and use longer gaps!
OK, once you’ve turned your motifs into phrases, you simply work your way through the entire solo and shape those phrases according to your arc. Little by little, all the pieces start fitting together until the solo begins to feel like one coherent musical statement that serves the song. The goal is a first draft of the entire solo.
What Scales Should You Use for a Guitar Solo?
One of the most common questions when learning to play guitar solos is: Which scale should I use?
I don’t think this is the right question because it lacks the necessary nuance. My hope is that after working through this guide, you’ll stop asking it. I want to gently pull you away from that question and help you ask a better one.
But first, let’s look at the typical exchange.
The student asks: “Which scale should I use?” The teacher answers: “Use the pentatonic scale. In our case it’s A minor. If you want to go beyond that, use the blues pentatonic scale.”
And the result is predictable.
The student does exactly what the teacher said and starts playing scales. But scales are not music. The answer leads to the typical scale-walking, scale-poking thing that almost every guitar beginner does.
Understand this first: a scale is simply a collection of notes. It’s a theoretical construct. At best it gives you a rough idea of which notes will likely fit. But playing a scale by itself doesn’t result in musical thoughts and ideas.
To make a solo sound musical, you need the concepts we’ve already discussed: motifs and phrasing.
You don’t want to sound like you’re playing a scale. You want to sound like you’re making music. That means playing motifs and phrases in the context of the chord progression you’re soloing over.
A more useful question can be: “Which notes can I use to create a motif or phrase over this chord?”
If the answer happens to be the notes of the A minor pentatonic scale, that’s great. But use the scale to create a great phrase and not to run the scale itself.
If you want to explore this idea further, I have a separate lesson on how to connect scales with triads and chords.
Step 5 — Edit and Finalize Your Guitar Solo
At this point, you should have a rough first draft of your solo. It doesn’t have to be perfect, but you should know more or less what you’re going to play in each section.
Up to now, you’ve been creating material. You should only start Step 5 once you have a more or less finished solo—a first draft, so to speak.
That means you’ve already done the prep work: you’ve outlined the chord notes, you have a rough idea of the arc, you’ve come up with a few motifs and turned them into phrases, and you more or less know what you’re playing in each bar. The solo feels almost finished.
Now you’re switching roles:
From creator → to editor.
And here’s something I can’t emphasize enough: take a break before you finalize.
It doesn’t make sense to edit immediately after you’ve been deeply involved in creating the solo for a few intense sessions. You’re “too close” to it. Take some time to distance yourself and let your subconscious process the work. When you come back after a few days (or even weeks), you’ll hear things differently—not necessarily more objectively, but often more clearly.
Editing checklist (make the solo stronger by removing things)
So how do you go through such an editing session? What are the things you have to look out for? Here are a few things I would look into after I have taken a break from my guitar solo.
- Just listen, then take notes. Do a few focused listening passes and check the essentials you’ve built so far. Can you recognize your motif, and is it repeated and varied? Is your phrasing deliberate (open/closed contrast, call/response, and space)? Do you feel an arc, and is intensity actually building? Write down everything that feels off—even if you can’t fully explain it yet. Those notes become your edit list.
- Spot filler parts. Mark the moments that sound like “finger movement” instead of a musical statement. Cut them, maybe replace them with silence, or rewrite them. In general, cutting more than you think is necessary can often improve the solo. It’s sometimes scary how much you can remove while making the solo better.
- Spot the best 2–3 moments. Most strong solos don’t have ten great ideas. They usually have a few good ideas. Find the strongest moments, keep them, and let the rest support them. Often that means removing parts that sound too similar.
- Make changes—and repeat if needed. Turn what you discovered into tangible changes: rewrite the section, adjust phrasing, simplify rhythm, and record again. Then listen again. If you’re satisfied, stop. If not, take a break and do one more editing pass.
Performance polish
Congratulations! You composed a guitar solo. And even if you applied only half of this process, it will usually sound more intentional than most “noodle takes.”
But even a well-composed solo can sound off if the performance is weak. So the next step is to practice it like the piece of music it now really is.
A few practical focus points:
- Timing: make sure your rhythm feels solid and relaxed
- Use dynamics to support your arc (less gain and quieter early, more gain or compression later)
- Articulation: bends, slides, vibrato, and note length need deliberate attention
- Consistency and time: give yourself plenty of time to learn your own solo
Next Steps: Practice Writing Short Solos
Even if you only take one or two ideas from this guide, it’s still worth your time. You can and should tweak the workflow to fit your style. But if you’ve never done this before, it’s a good idea to try it exactly as laid out first. You need real feedback from the work of actually writing a guitar solo. After you’ve composed a few, you’ll quickly notice what works best for you and what doesn’t.
A simple way to make this stick is to run the workflow on short, easy material like one single chorus of a backing track, or a single pass over a 12-bar blues. Do it often enough and you’ll start hearing music more structurally: motifs, phrasing, arc etc.
If you want a practical next step, do this: compose one short guitar solo per week or per month using this method, record it, listen back, and do one edit pass.
And if you feel like your bottleneck is the fundamentals (fretboard clarity and basic theory), grab my free e-book with tabs and videos. It’s designed to build strong fretboard understanding so this composing framework becomes easier to execute.
Thanks for reading.
Stay tuned and have fun.

FAQ About Writing Guitar Solos
Is this method good for writing a simple guitar solo?
Yes. In fact, this method works best when you keep the solo simple at first. One or two short motifs with variations, a few simple phrases, and one strong ending will usually do the trick.
What is the easiest way to start writing a guitar solo?
Work in small sections. Start with one short motif instead of trying to invent an entire solo at once. It’s much better to focus intensely on just the beginning of the solo and really work out the first few bars than to overwhelm yourself.
Should I write a guitar solo or improvise it?
Before you can effortlessly improvise a good guitar solo on the spot, it helps a lot to write a few solos first. Both skills support each other: writing solos teaches you structure, phrasing, and note choice more consciously, which usually makes your improvisation sound more musical later.
How long should a guitar solo be?
It depends. Your solo should always serve the song, and every genre has certain musical conventions regarding the length of a guitar solo. I would say it’s usually worth respecting those conventions. But if your solo tells a compelling story and contributes to the song, then take the time to develop it. Just don’t drag things out for no reason.
How to write a guitar solo if I only know a scale shape?
This obviously has its limits, but it can be done—and it has been done successfully before (Metallica’s “Nothing Else Matters” solo is a good example). Just stick to the workflow and you should be able to come up with something musical. Make sure you’re aware of the chord tones, develop motifs and phrases, and then carefully edit your first draft.
How do I write a guitar solo that doesn’t sound like random licks?
Randomness usually comes from switching ideas too often. Find one motif that can appear at least three times, then vary only one thing each time (ending note, rhythm, register, or articulation) so the listener can recognize the idea.
How do I write solos on guitar that “tell a story”?
Be intentional with motifs, phrasing and give the solo an arc with a contrasting intensity. Even a basic A/B shape with a clear ending will make the solo feel more composed and intentional.
How to make a solo on guitar when I’m stuck and nothing sounds good?
It depends on where you are stuck. Writing a solo is usually not a complete beginner task. You need at least some experience with the basics, things like scales, triads, a few licks, or having learned one or two solos before. If you feel completely overwhelmed, work on those foundations first and then come back to this process later. And if you do have the experience but still feel stuck, maybe you’re simply having a bad day—and that’s okay too. Take a break, clear your head, and come back another day.